
On this pageTable of contents+
- What Is Google Tag Manager (GTM)?
- Why do SEO practitioners need GTM?
- GTM vs. Google Analytics
- GTM's Core Components and How They Work
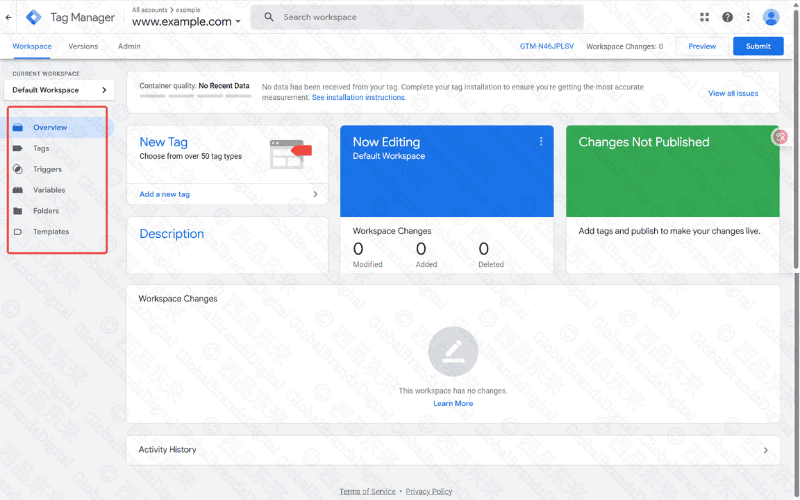
- Core components
- How GTM works
- 1. Create a Google Tag Manager Account and Container
- Register or sign in
- Create the container
- Get the container snippets
- 2. Set Up the GTM Container
- Install the container snippets
- Confirm the installation with Tag Assistant
- 3. Create a GTM Tag
- Choose the tag type
- Configure the tag
- 4. Configure Google Tag Manager Triggers
- Choose a trigger
- Configure trigger conditions
- 5. Use Variables
- Built-in variables
- Custom variables
- 6. Test and Debug GTM Tags
- Use Preview mode
- Test the tag
- Debug and revise
- 7. Publish GTM Tags
- Submit and publish
- Maintain and Optimize Google Tag Manager
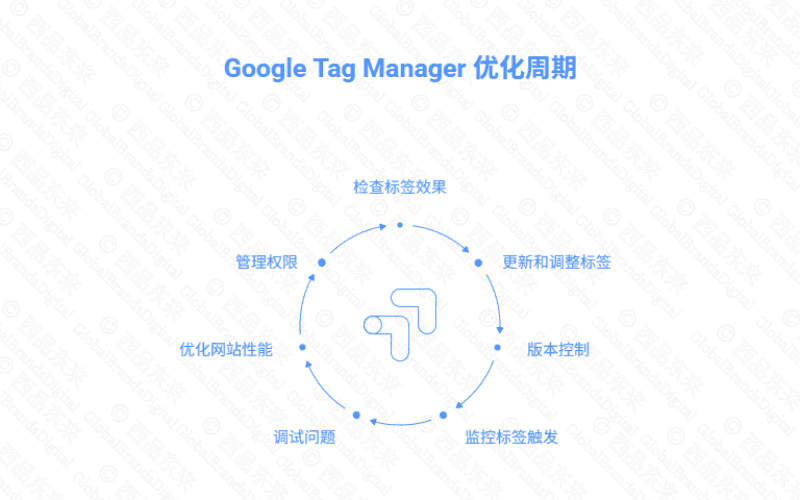
- 1. Check tag results regularly
- 2. Update and adjust tags as requirements change
- 4. Monitor firing behavior
- 5. Debug problems quickly
- 6. Protect website performance
- 7. Manage permissions and teamwork
- How to Analyze GTM-Enabled Data and Make Optimization Decisions
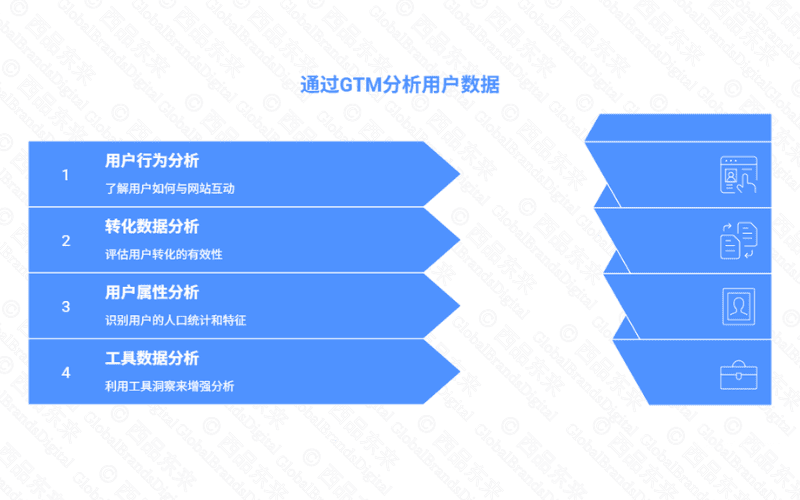
- 1. What data does GTM help send?
- 2. How should you analyze data sent through GTM?
- 3. Turn the data into a decision: what comes next?
- Advanced Google Tag Manager Techniques
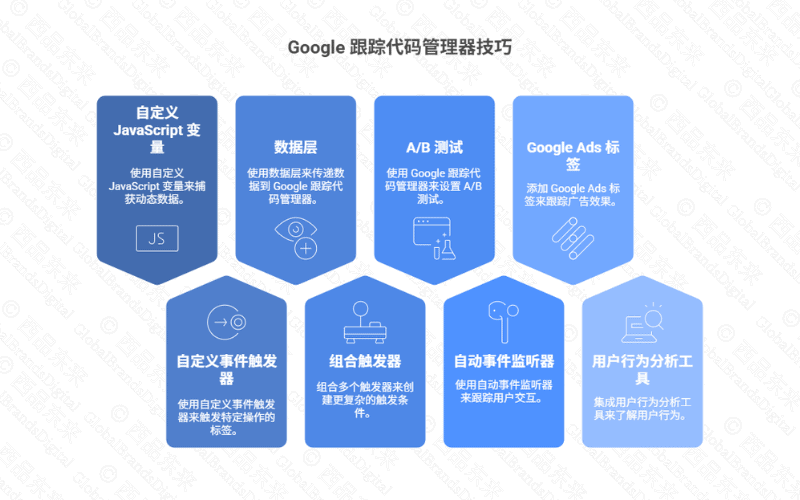
- 1. Custom JavaScript variables
- 2. Fire tags from custom events
- 3. Use the data layer
- 4. Combine several triggers
- 5. Test tag configurations with an A/B design
- 6. Automatic event listeners
- 7. Add Google Ads tags
- 8. Integrate behavior-analysis tools such as Hotjar and Crazy Egg
- Important Precautions When Using Google Tag Manager
- 10 Common Questions About Google Tag Manager
- 1. What is Google Tag Manager used for?
- 2. Why does Google Tag Manager appear in my website data?
- 3. Can I block Google Tag Manager?
- 4. What data can Google Tag Manager help measure?
- 5. How can I stop tag-based tracking?
- 6. How do I know whether a site uses GTM?
- 7. When should an organization use Google Tag Manager?
- 8. What are Google Tag Manager's disadvantages?
- 9. Is Google Tag Manager required?
- 10. Is Google Tag Manager safe to use?

As an SEO practitioner, have you ever lost time waiting for a developer whenever a measurement tag needed to change? Google Tag Manager (GTM) can reduce that routine dependency by giving an authorized team a workspace for managing tags. Initial installation, data-layer changes, consent integration and custom code may still require engineering support and review.
This guide explains the source's complete GTM workflow, from basic setup through analysis, advanced techniques, maintenance, safeguards and common questions. The aim is to help you manage website tags more efficiently and avoid errors that can undermine the data.
What Is Google Tag Manager (GTM)?
Google Tag Manager is a free tag-management tool for configuring and deploying tags on a website or app. These may include Google Analytics measurement, advertising conversion and other supported tags. After the container is installed, many routine additions, removals and changes can be made in the GTM interface without editing the site's source code each time.
Why do SEO practitioners need GTM?
- Reduce routine developer dependency: SEO work often needs analytics and measurement changes. GTM lets trained, authorized users manage many tags directly, although implementation work that changes the site or data layer still belongs with developers.
- Respond and adjust faster: SEO measurement requires ongoing testing. A controlled GTM workspace can shorten the path from an approved change to a testable draft and then to usable destination data.
- Reduce deployment errors: The visual interface, Preview mode and versions make tag changes easier to review than ad hoc source-code edits. GTM does not guarantee accuracy, so every change still needs testing.
- Coordinate several tools: GTM supports Google products and third-party templates, allowing a team to route approved event data to analytics, advertising and other destinations from one governed container.
GTM vs. Google Analytics
GTM and Google Analytics are different products, although they are often used together:
- Google Analytics receives and reports configured website or app data so analysts can study traffic, events and user behavior.
- Google Tag Manager manages and deploys tags. It can place the Google tag and event configurations on a site, but it is not the reporting interface that interprets the resulting Analytics data.
GTM therefore supports Analytics and other destinations by controlling deployment. Analytics provides reports for analysis. Using both can make an SEO measurement workflow more efficient, but only when the event design and implementation are accurate.
GTM's Core Components and How They Work
Core components
Account and container
- Account: The top level used to manage an organization's GTM work. One account can contain multiple containers.
- Container: The place where tags, triggers and variables are managed for a website or app. Google currently recommends one container for each company website or app.
Tag
- A tag tells GTM what to do, such as send an event to Analytics or record a Google Ads conversion. Examples include the Google tag and supported conversion tags.
Trigger
- A trigger determines when a tag may fire. It listens for an event, such as a page view or button click, and evaluates the conditions attached to that event.
Variable
- A variable supplies a value that a tag or trigger can use at runtime, such as the current page URL or the ID of a clicked element.
How GTM works
You configure a tag for the task, a trigger for the event and conditions, and variables for the values the configuration needs. When GTM processes an event that meets the trigger conditions, the associated tag can fire and send the configured information. This routine can run without a new source-code edit for every approved tag change, but the underlying site, data layer and consent design still matter.
The next sections begin with the account and container and then follow the source tutorial step by step.
1. Create a Google Tag Manager Account and Container
Register or sign in
Go to Google Tag Manager and sign in with a Google Account. Use an account controlled by your organization so access survives staff or agency changes. Do not leave a single employee or outside agency as the sole owner. Google's current account and container setup guide documents the interface.
Create the container
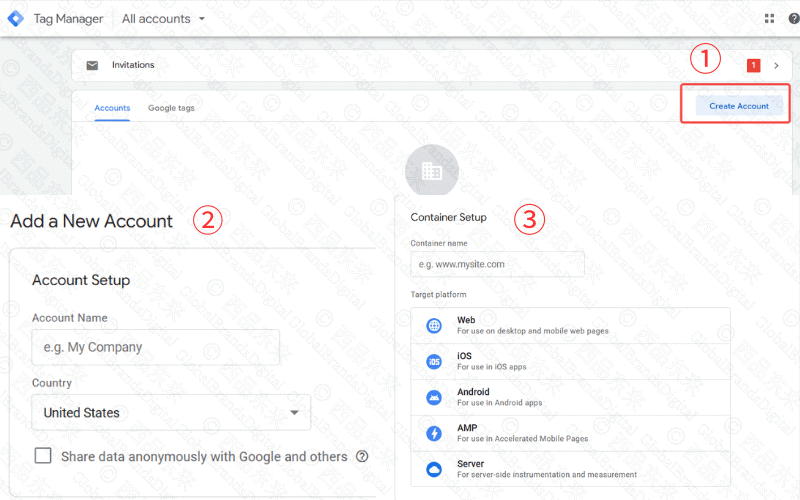
- On the Accounts tab, select Create account.
- Enter the organization name and select the country for the account.
- Choose the container type that matches the property:
- Web for a website or web app
- iOS or Android for the corresponding mobile app; AMP and Server are also available for their specific implementations
- Enter a recognizable container name. For a web container, Google's current guidance recommends the site's top-level URL, such as www.example.com. The source refers to a separate target-URL field, but the interface may no longer show one.
- Select Create and review the applicable terms.
Get the container snippets
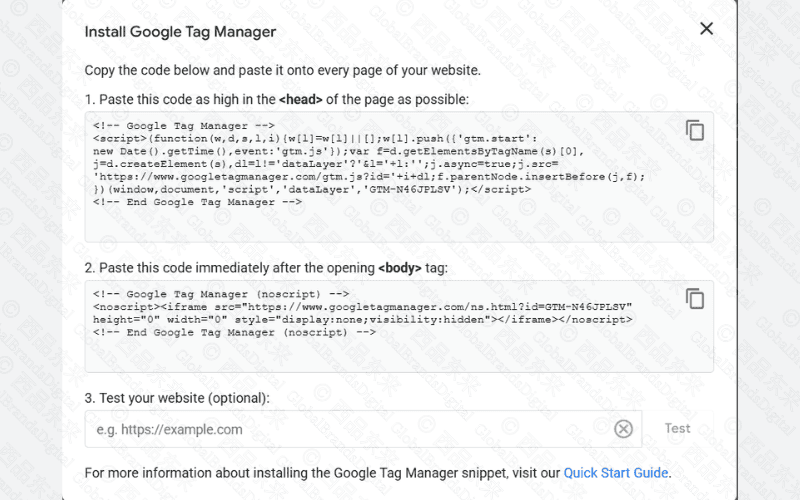
- After the container is created, GTM presents two installation snippets. Both must be copied exactly and placed correctly:
- Place the first snippet as high in the page's <head> element as possible. This script initializes the data layer and loads the GTM container.
- Place the second snippet immediately after the opening <body> tag. This noscript iframe provides limited fallback behavior when JavaScript is unavailable; it does not reproduce every JavaScript tag.
- Transfer the snippets through a code-preserving channel and add them to the site's templates. A messaging app such as the QQ example in the source may alter formatting, so compare the pasted code with the original before deployment.
2. Set Up the GTM Container
Install the container snippets
- Open the website's code, template system or CMS integration where global HTML can be managed.
- Place the first snippet as high in the <head> as possible.
- Place the second snippet immediately after the opening <body> tag. Google's current web-container guide shows where each snippet goes.
Confirm the installation with Tag Assistant
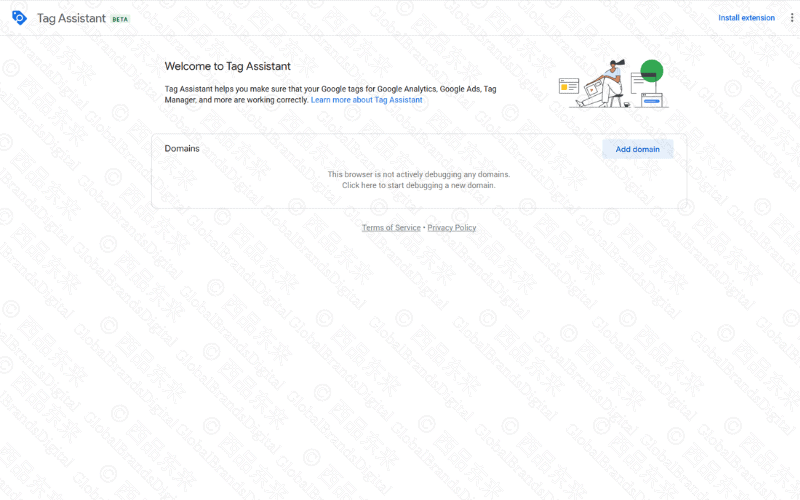
- Google's unified Tag Assistant Chrome extension can help troubleshoot a Google tag or GTM implementation. Preview mode can also launch Tag Assistant without making an untested workspace live.
- Open the site in Tag Assistant, or select Preview in the GTM workspace and connect the relevant URL.
- Review the detected container, firing status and diagnostics. A successful connection is useful evidence, but also test the intended events and data values; investigate missing, duplicate or incorrect tags rather than relying on a single color indicator.
3. Create a GTM Tag
Choose the tag type
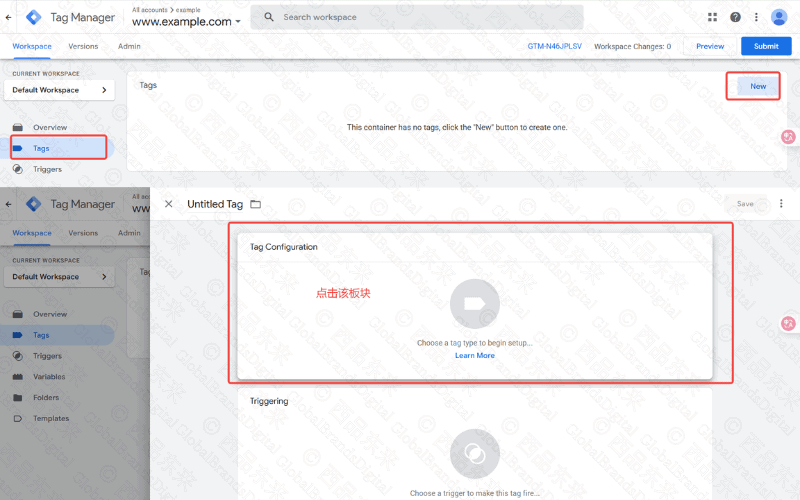
After signing in to GTM, select Add a new tag from the workspace overview, or open Tags in the left navigation and select New.
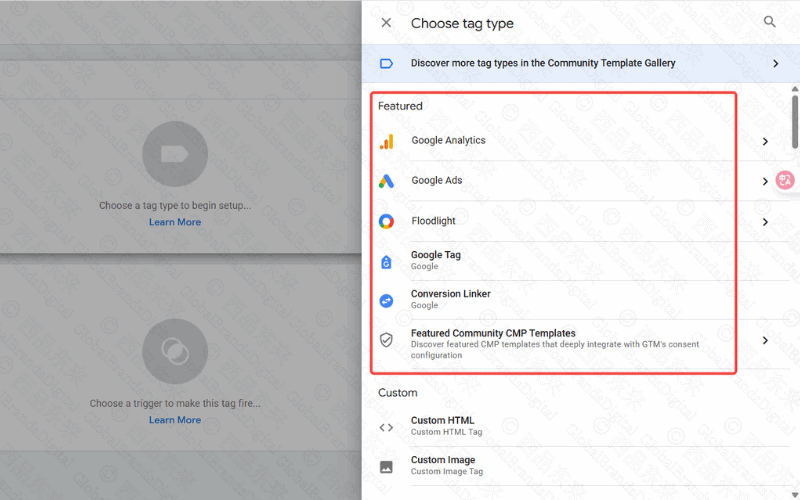
In the new tag panel, select Tag Configuration and then choose the tag type required by the implementation.
How to choose a tag type
- Google Analytics: Use the currently supported Analytics templates to send configured website events to a GA4 property.
- Google Ads: Use the relevant Google Ads template for approved conversion or remarketing measurement.
- Floodlight: Use Floodlight tags for supported Campaign Manager 360 or Display & Video 360 measurement.
- Google tag: Configure the Google tag used by destinations such as Google Analytics and Google Ads.
- Conversion Linker: Help supported advertising tags measure click information needed for conversions.
- Custom HTML: Insert vendor-supplied HTML or JavaScript only when a supported or sandboxed template is not suitable; treat it as production code.
- Custom Image: Request an image URL, including a measurement-pixel URL, when that implementation is justified.
Configure the tag
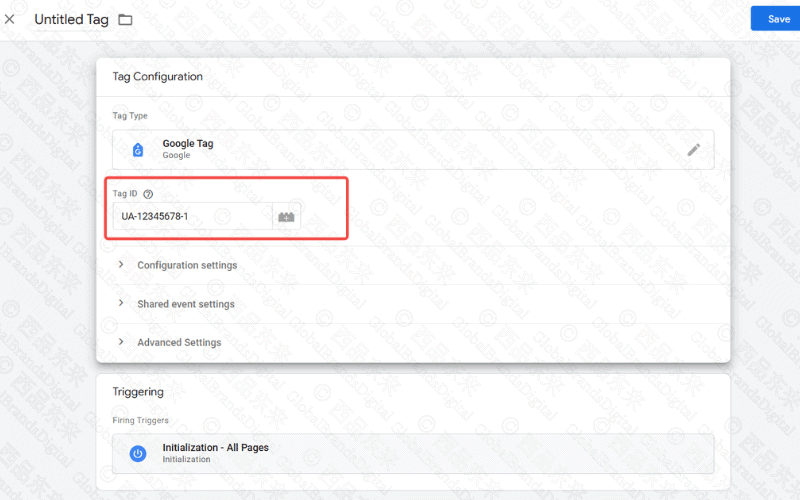
After selecting a tag type, complete the required configuration fields.
The source describes choosing between Universal Analytics and GA4 and entering either a UA tracking ID or a GA4 Measurement ID. Universal Analytics is now a legacy product, so a current web implementation should follow Google's GA4 setup instructions for the Google tag and supported event templates, using the relevant tag ID such as G-XXXXXXXXXX. Keep the source's UA-12345678-1 example only as a description of an older interface, not as current setup advice.
Give the tag a descriptive name, review the settings and select Save.
4. Configure Google Tag Manager Triggers
Choose a trigger
Open the tag you just saved.
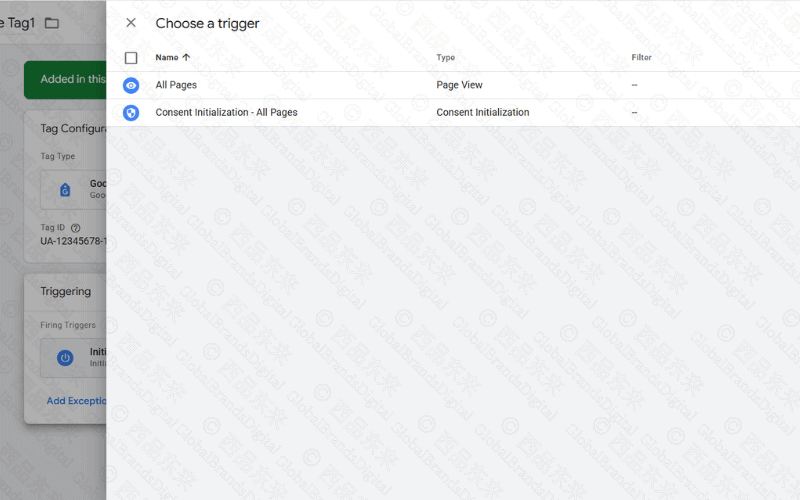
The source says GTM automatically assigns an All Pages trigger to a new tag. That is not a safe general rule for the current product: every tag needs at least one trigger to fire, and you should explicitly select or create the trigger that matches the intended event. Some tag configurations or copied examples may already show a trigger.
If the tag truly needs to run on every page view, select the appropriate All Pages trigger, confirm that consent and initialization requirements are satisfied, and save the tag. Do not use All Pages merely because it is convenient.
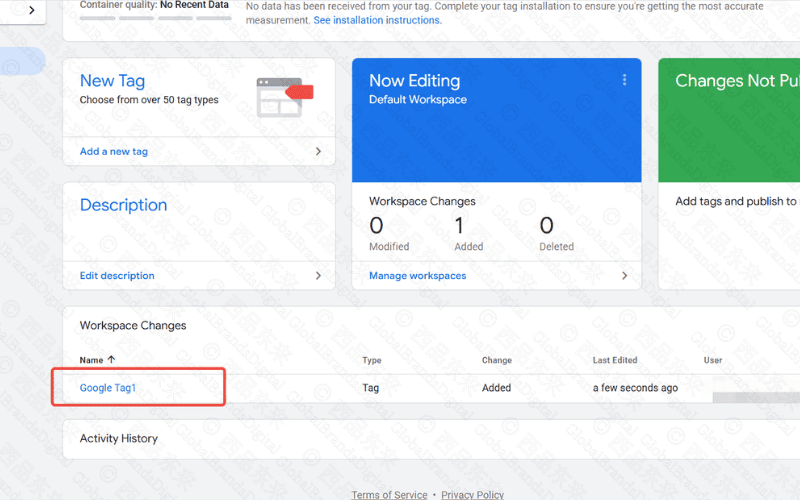
To change the trigger assignment, use the controls in the tag's Triggering panel.
Remove an existing trigger
Select the minus control beside the trigger assignment to remove it from the tag. Removing the assignment does not necessarily delete the trigger definition from the container.
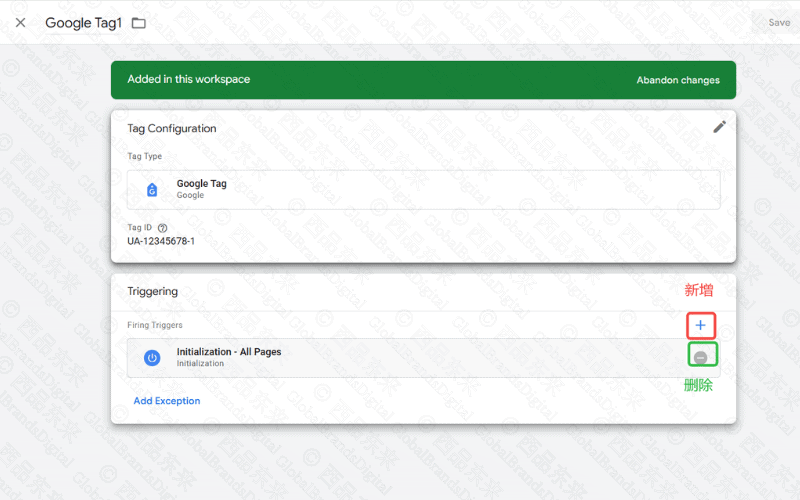
Add another trigger
Select the plus control to open the trigger-selection panel.
All Pages represents the standard page-view event on all pages.
Consent Initialization - All Pages is intended for tags or templates that set or update consent state before other triggers proceed; it is not a general replacement for All Pages.
Initialization - All Pages fires before standard page-view triggers and should be reserved for configurations that genuinely need that timing.
Choose the trigger whose event and timing match the tag's purpose. All Pages is common, but it is not automatically correct for every tag.
Create a custom trigger
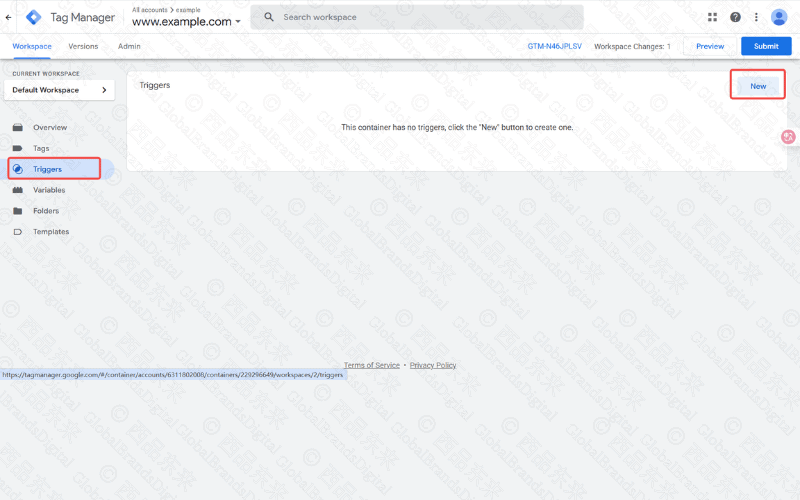
If those three choices do not meet the need, create a more specific trigger for a page, click or another event. Open Triggers in the left menu, select New, open Trigger Configuration and choose the event type that best matches what you need to measure:
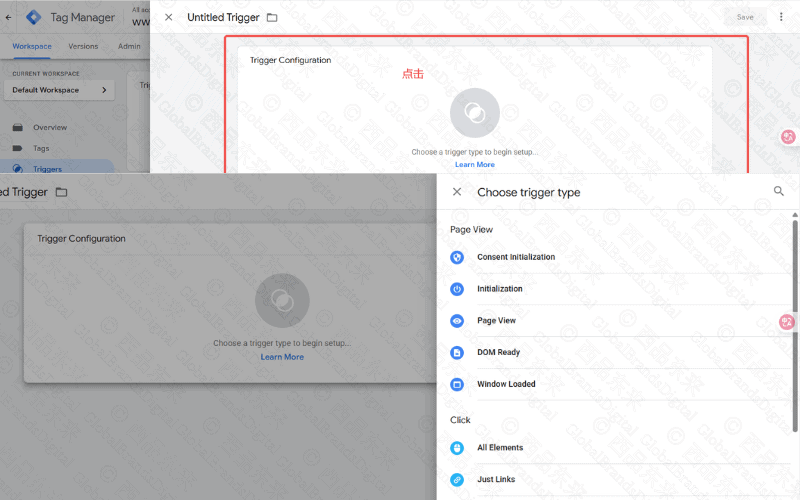
- Page View: Listen for a page-loading stage, such as Page View, DOM Ready or Window Loaded.
- Click: Listen for a click on an element or link, then narrow the event to the intended control.
- User interaction: Use the appropriate Form Submission, Scroll Depth, YouTube Video or related trigger type for the interaction being measured.
- Other: Use a Custom Event, JavaScript Error, Timer or another supported trigger for a specifically designed case.
Configure trigger conditions
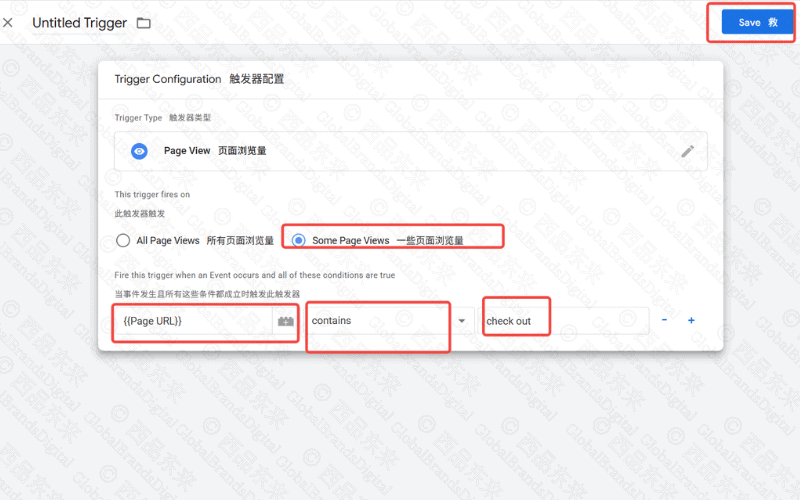
After selecting a trigger type, define the conditions for that event. Google's current trigger documentation describes each filter as a variable, operator and value. The source examples translate as follows:
- Page View: Select Page View, choose Some Page Views, set a condition such as Page URL contains checkout, and save.
- Click: Select All Elements or Just Links, choose Some Clicks, and filter with a stable value such as Click ID or Click Classes; the source uses buy-button.
- Form Submission: Select Some Forms and filter with an identifier such as Form ID or Form Classes; the source uses contact-form. Test successful and failed submissions because a browser submit event is not always a completed business outcome.
- Scroll Depth: Configure a threshold such as 50% vertical depth and verify how it behaves on different page lengths and devices.
- Custom Event: Enter the exact event name pushed by the implementation; the source uses formSubmitted.
- JavaScript Error: Configure the JavaScript Error trigger and any filters needed for the diagnostic case.
- Timer: Define the interval and limits, such as the source's 30-second example, and avoid creating unnecessary repeated events.
Select Save after the conditions have been reviewed.
5. Use Variables
Variables are not required for every simple configuration, but they allow tags and triggers to use page or event values. Even an All Pages trigger uses built-in event context; more specific conditions commonly rely on URL, click or form variables.
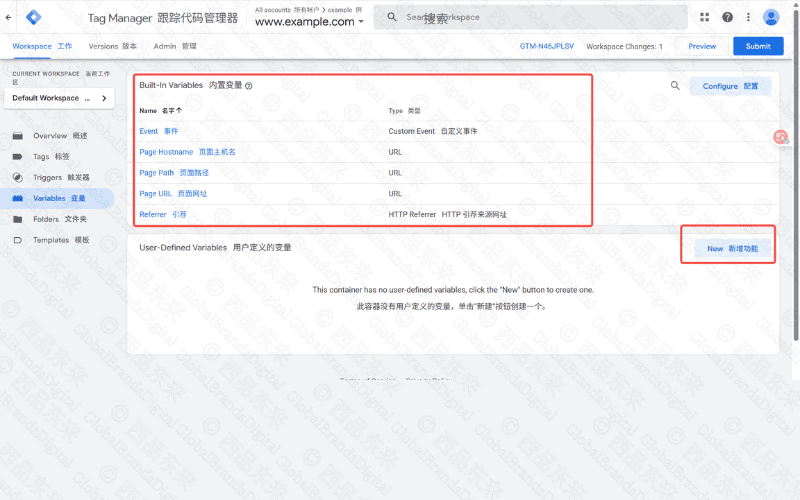
Built-in variables
GTM provides built-in variables that can be enabled and used directly, including:
- Page URL: The current page address
- Click Element: The element exposed for a click event
- Form values: Form-related built-in variables such as Form ID, Form Classes, Form Element, Form Target, Form URL and Form Text; GTM does not expose every submitted field automatically
Select these variables when a tag or trigger needs them. For example, use Page URL in a filter that limits a tag to an approved route.
Custom variables
If built-in variables do not meet the requirement, GTM also supports user-defined variables. Source examples include:
- Custom JavaScript variable: Return a value derived by reviewed JavaScript. Prefer a stable data-layer value or a permission-controlled custom template when possible.
- First-party cookie variable: Read an allowed first-party cookie value, such as an appropriate state value. Confirm that consent permits it, collect no more than needed and protect the value.
Open Variables and select New in the User-Defined Variables section to create one.
6. Test and Debug GTM Tags
Testing and debugging are essential before publication. GTM's Preview mode and Tag Assistant let you examine whether tags, triggers and variables behave as intended in the current workspace draft.
Use Preview mode
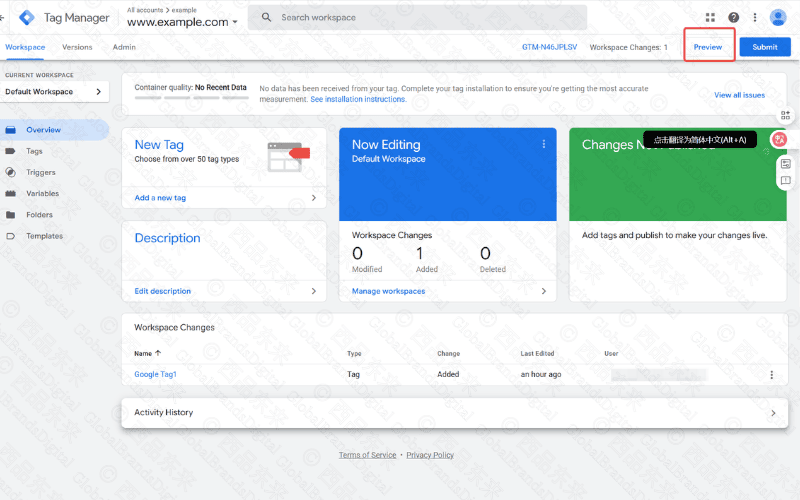
- In the GTM workspace, select Preview at the top right.
- Enter the website URL in Tag Assistant and select Connect. Browse the relevant flow, then use the debug interface to inspect:
- Which tags fired or did not fire
- Which trigger conditions were or were not met
- The variable and data-layer values available for each event
The interface updates as you move through the previewed site. Compare the actual events and values with what the plan says should happen. Google's current Preview and debug guide explains this workflow.
Test the tag
Test with the Google Tag Assistant extension
- Install or open Tag Assistant:
- Install Google's unified Tag Assistant extension from the Chrome Web Store if the troubleshooting case benefits from it.
- Open its side panel and start a troubleshooting session for the site; older instructions that refer to an Enable button and the deprecated Companion extension may no longer match the current interface.
- Test the tag:
- Visit the relevant page and perform the exact action that should cause the event.
- Inspect every detected Google tag or container and the information sent for the event.
- Review diagnostics for missing, duplicated or misconfigured tags. A successful firing indicator does not prove that event names, parameters, consent state or business meaning are correct.
Test with browser developer tools
- Open developer tools:
- In Chrome, press F12 or use Inspect to open developer tools.
- Open the Network panel, preserve the log if the flow changes pages, and repeat the test action.
- Inspect network requests:
- Filter the request list for the intended GTM, Analytics, Ads or other destination endpoint.
- Confirm not only that a request exists, but also that it occurs once at the correct time and carries the approved values. If it is absent, duplicated or malformed, return to the event, trigger, consent and tag configuration.
Debug and revise
If a tag does not behave as expected, return to GTM and revise the tag, trigger or variable. Repeat the positive case, negative case, consent-state cases and relevant device or route cases until the evidence matches the specification.
7. Publish GTM Tags
After the workspace has passed its defined Preview and destination checks, it can be submitted for publication.
Submit and publish
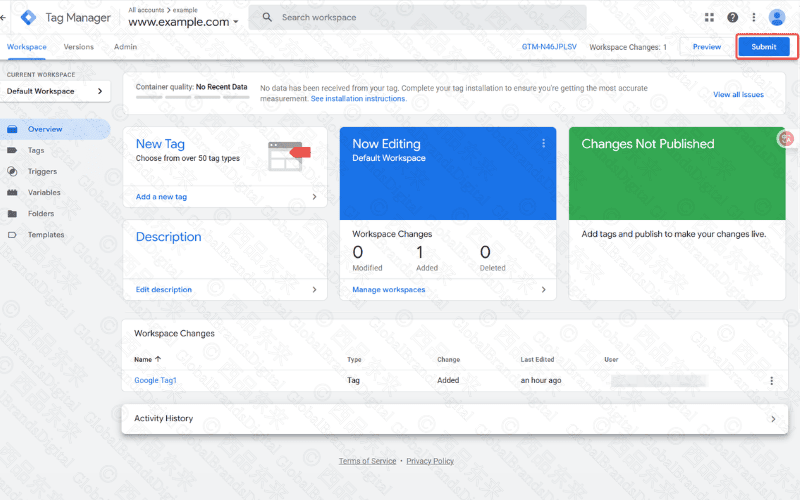
- Select Submit at the top right of the GTM workspace.
- Review the changes and enter a specific version name and description, such as the source's example, Add Google Analytics tag.
- Select Publish and Create Version, choose the intended environment if applicable, and publish. The changes then become active for that environment. Google's publishing and version guide also explains how versions support recovery.
Maintain and Optimize Google Tag Manager
Publishing is not the end of the work. Tags need regular review so they continue to fire at the intended time and send accurate, permitted data. The purpose is to support better website decisions, not to let old configurations accumulate unattended.
1. Check tag results regularly
After publishing, first confirm that the tag works on the live site and that the receiving system reports plausible data. Several checks can help:
Review Google Analytics real-time data: If GTM sends events to Analytics, use the relevant real-time or DebugView report to confirm that an approved test action appears. Real-time arrival alone does not prove that attribution, parameters or longer-term reporting are correct.
Return to GTM Preview: Preview lets you inspect a new draft without publishing it to regular visitors. Connect the website, reproduce the use case, and compare tag, trigger and variable details with the expected behavior.
2. Update and adjust tags as requirements change
Website content, products and campaigns change, so the associated measurement configuration also needs review. For example:
- Add a tag: A new product or campaign may need an approved event or receiving system. Before adding it, state the question it should answer, confirm consent, assign an owner and write the tests.
- Remove an obsolete tag: Delete or pause a tag that is no longer required so it does not create unnecessary requests, duplicate data or ongoing vendor access. Test and publish the removal like any other change.
- Modify an existing tag: Update a Google tag or event when the receiving system or business need changes. Then check whether the change affects comparisons with older data.
3. Version control and rollback
Record the change history: For every version, describe what changed, why it changed and which tests passed. A note such as a changed trigger condition or tag configuration makes later review possible.
Restore a stable version: If a new setup causes a problem, set a known version as the latest draft, review it and publish it to the affected site. The older version helps the team recover, but the team must still check data affected before the rollback.
4. Monitor firing behavior
Triggers and variables determine when a tag runs. If it does not fire as expected, begin with the event sequence and trigger filters rather than assuming the destination is at fault.
Check the conditions: If a button-click tag does not fire, confirm that the selected click event occurs and that the chosen ID, class or other filter is stable on the actual element.
Update variables: When a new product type or interaction needs measurement, change the data-layer contract or variable deliberately. Avoid scraping unstable page text when a structured value can be supplied.
5. Debug problems quickly
If destination data changes unexpectedly or a tag fails to fire, use more than one diagnostic signal:
Tag Assistant: Connect a troubleshooting session and inspect the event timeline, consent state, tags and data-layer values. Its diagnostics can narrow the cause, but the analyst must still compare the values with the measurement specification.
Browser developer tools: Inspect console errors and network requests. Verify request timing, count, status and payload, correct the implementation, and repeat the checks before publishing another version.
6. Protect website performance
Tags can support measurement, but too many scripts or poorly designed custom code can increase main-thread work, network activity and privacy exposure. Review performance instead of assuming that container-based deployment is free.
Remove unnecessary tags: Retain only configurations with a current owner and use. Check for duplicate Google tags, abandoned advertising pixels and vendor code that no longer serves a documented purpose.
Sequence or delay only when valid: The source suggests delaying nonessential tags such as social-sharing measurement. Do so only when it remains compatible with consent, event timing and data quality; test whether delayed loading loses the event or changes the user experience.
7. Manage permissions and teamwork
Set appropriate permissions: GTM provides account-level User or Administrator access and container-level Read, Edit, Approve and Publish permissions. Apply least privilege, keep at least two active organization administrators, and do not leave an outside agency as the only administrator. Google's permissions guide explains the current roles.
Coordinate the team: Use workspaces, version notes, owners and review checkpoints so team members understand current configurations and do not create duplicate or conflicting changes.
How to Analyze GTM-Enabled Data and Make Optimization Decisions
1. What data does GTM help send?
GTM does not analyze users by itself. It can send specifically configured events and parameters to approved destination platforms. Depending on the measurement plan, these may include:
- Behavior data: Page views, button clicks or form interactions
- Conversion data: Completed purchases, registrations, qualified form submissions or other defined outcomes
- Advertising data: Approved ad-click and conversion signals used to assess a campaign in the relevant platform
These events can help answer what people do on the site and where investigation may be useful. They do not explain intent or causation without context.
2. How should you analyze data sent through GTM?
Start with a few common analytical views in the destination platform:
Analyze user behavior data
Page traffic: Analytics reports can show which pages receive more or fewer visits. Low traffic does not by itself prove that the content or design is weak. Check whether search engines index the page, people search for its topic, other pages link to it and the tag covers the full date range.
- Possible next step: For a low-traffic page, review how people are expected to find it, whether it answers the intended need and whether content, structure or user experience warrants a change.
Clicks: Configured click events can show whether users select particular buttons or links. Compare those events with page views and eligible exposures before treating a raw count as engagement.
- Possible next step: If few eligible visitors click an important control, ask whether it is useful, clearly worded and easy to find. Then test a justified change.
Analyze conversion data
Conversion rate: Google Ads and Google Analytics can report defined outcomes for a page or campaign, such as a purchase or qualified form submission. Confirm what the rate divides, how the report credits the outcome and whether duplicate events are removed.
- Possible next step: If a page or campaign underperforms its valid comparison, investigate the offer, intended users, ad promise, page experience and measurement before changing several factors at once.
Funnel analysis: An ecommerce funnel can compare product-page, cart and checkout steps and identify where measured progress decreases most.
- Possible next step: Study the largest verified drop-off point and test an appropriate change, such as clearer costs, a simpler checkout step or suitable payment options.
Analyze user-attribute data
Traffic-source analysis: Destination reports can compare organic search, social, advertising and other acquired traffic. GTM may help send campaign or event context; the destination platform classifies channels and produces the reports.
- Possible next step: If a channel converts qualified visits below a valid benchmark, check whom it reaches, whether the landing page matches the message and whether the tag works before reallocating effort.
Analyze data from behavior-analysis tools
Heatmaps and scroll behavior: GTM can deploy an approved Hotjar or Crazy Egg tag so those tools can produce their own interaction reports. Review sampling, consent, masking and data collection before using such tools.
- Possible next step: If visitors rarely reach or use a helpful section, ask whether they can find and understand it. Test a suitable redesign instead of assuming that a heatmap explains why.
3. Turn the data into a decision: what comes next?
After validating the data and comparison, choose the next investigation or test. Common decision points in the source include:
3.1 A page with a high bounce rate
- Question: A high bounce rate may mean the page is irrelevant, slow or measured incorrectly. It can also be normal when one page answers the visitor's question.
- Next step: Segment by page role and qualified outcome, review content, design and performance, and use a controlled test if a specific change has a clear hypothesis.
3.2 A low-converting ad or page
- Question: A low rate may come from the offer, message, targeting, page experience or poor traffic. The event may also be implemented incorrectly.
- Next step: Verify the measurement, identify the likeliest constraint, and test a focused change to ad copy, targeting, page design or the conversion path.
3.3 Limited user interaction
- Question: Few clicks, scrolls or form actions may mean the content is irrelevant or the controls are unclear. The page may also do its job without much interaction.
- Next step: Check the intended task and eligible exposure before revising controls, visual emphasis or interaction design.
3.4 A poorly performing traffic source
- Question: A source with a lower verified conversion rate may be mismatched to the intended audience or landing content, or may be classified incorrectly.
- Next step: Review campaign tagging, targeting, message-to-page relevance and qualified outcomes before changing the channel strategy.
Advanced Google Tag Manager Techniques
After the basic workflow is stable, the following source techniques can support more complex measurement. Apply them only when the use case, data contract, consent and test coverage are clear.
1. Custom JavaScript variables
GTM supports Custom JavaScript variables that return a value not available from a built-in variable. They can be useful, but DOM-dependent code is fragile and should not be the first choice when developers can expose a stable data-layer value.
Example: a product filter such as price range or brand may be generated dynamically. The source proposes extracting the visible value with JavaScript and using it in a tag. Confirm that the value is appropriate to collect and that the selector remains stable.
- How to do it:
- Create a Custom JavaScript variable in GTM.
- Enter reviewed JavaScript that returns the filter value. The source's selector is equivalent to document.querySelector('.filter-price')?.textContent, with a null case handled safely.
- Reference the variable in the relevant trigger condition or tag parameter, and test it across every supported page state.
This can add useful context to an approved event, but it should not collect personal or sensitive data merely because the page exposes it.
2. Fire tags from custom events
A custom event lets GTM respond to a site-defined action that a standard listener cannot represent reliably.
Example: a dynamically loaded form may not produce a dependable native form-submission event. The application can push a custom event after the validated success state so GTM can respond to the actual outcome.
- How to do it:
- Have the site push an event such as dataLayer.push({'event': 'formSubmitted'}); at the defined moment.
- Create a GTM Custom Event trigger for formSubmitted, attach it to the intended tag and test that failed or duplicate submissions do not send the event.
3. Use the data layer
The data layer is a JavaScript object used to pass organized events and variables to GTM and the Google tag. It provides a more stable contract than parsing values scattered through page markup.
Example: an ecommerce site may need the ID, name and permitted value of a viewed product. The application can push those fields with a product-view event, and GTM can map them to variables used by a destination tag.
- How to do it:
- Push approved values from the page, following the source's simplified example: dataLayer.push({'productId': '1234', 'productName': 'Laptop'});. In a production design, add an event name so processing occurs at a defined point.
- Create Data Layer Variables in GTM for fields such as productId.
- Use the variables in the intended tag, for example as documented GA4 ecommerce event parameters, and verify the destination payload.
4. Combine several triggers
Some tags should fire only after several conditions have occurred. Attaching multiple ordinary firing triggers to one tag generally creates alternatives, not an all-conditions rule.
Example: the source wants an event only after a user visits a particular page and clicks a specific button. Use filters on the click event when the conditions are available together, or use a GTM Trigger Group when separate trigger events genuinely must all occur.
- How to do it:
- Create and test the relevant page-view and button-click triggers.
- Create a Trigger Group containing both when their occurrence during the page lifecycle is the intended rule, then attach that group to the tag and test order, repetition and reset behavior.
5. Test tag configurations with an A/B design
The source proposes comparing two ways to configure an advertising or conversion tag. GTM can deploy tags that an experiment needs, but it cannot by itself run a complete test or assign users reliably.
Example: two properly defined variants might send different approved parameters so an experiment platform can compare qualified outcomes. Do not send users inconsistent conversion definitions merely to see which count is larger.
- How to do it:
- Define variants A and B, the hypothesis, success metric, guard metrics and unchanged conversion definition.
- Use an appropriate experimentation system to make stable user-level assignments; the source's proposed GTM random trigger is not a standard built-in trigger and should not be treated as one.
- Send the variant identifier to the destination and analyze the prespecified outcome with adequate sample size and quality checks.
6. Automatic event listeners
GTM's built-in trigger types can listen for common interactions such as clicks and scroll depth without bespoke listener code.
Example: measure a click on a defined button or the point at which a visitor reaches a specified scroll threshold. The trigger still needs stable filters and validation; an automatic listener does not make every captured interaction meaningful.
- How to do it:
- Create a Click or Scroll Depth trigger and limit it to the intended element, page and threshold.
- Configure the destination tag and test one valid event, invalid events and repeated interactions.
7. Add Google Ads tags
GTM can deploy supported Google Ads conversion tags to record defined outcomes for campaign analysis.
- Set the conversion trigger: Fire only after the verified outcome, such as a completed purchase, rather than a button click that may fail.
- Test the Ads tag: Use Tag Assistant and Google Ads diagnostics to confirm that the tag is detected and that test conversions arrive without duplication. Reporting may not be instantaneous.
- Implement consent controls: Integrate the site's CMP and Google's current Consent Mode guidance so tags receive the correct consent state before they act. Consent Mode changes tag behavior; it does not by itself satisfy GDPR or any other law, so obtain appropriate legal and privacy review.
8. Integrate behavior-analysis tools such as Hotjar and Crazy Egg
GTM can deploy approved Hotjar, Crazy Egg or similar tags that record clicks and scroll behavior in their own systems. Before enabling one, review the fields it sends, what it masks, how it samples and retains data, how it responds to consent, how it affects the page and who at the vendor can gain access. The reports show observed patterns; they do not fully explain why people behaved that way.
Important Precautions When Using Google Tag Manager
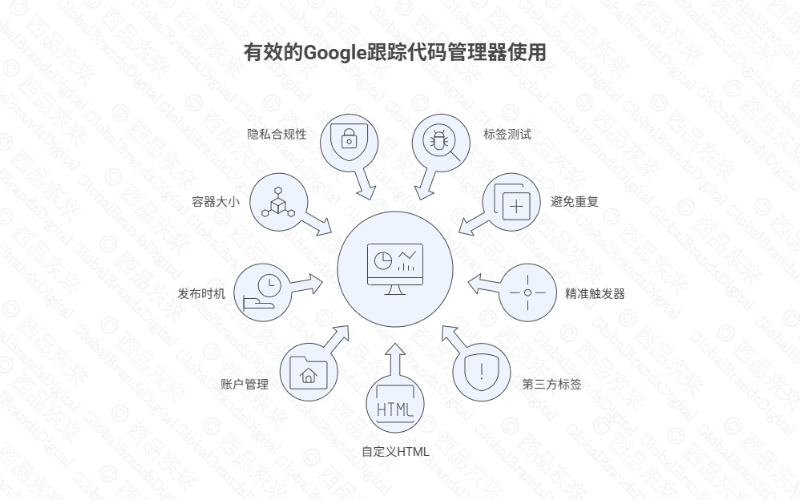
GTM is flexible enough to corrupt data, slow a page, violate privacy or expose a site when a team manages it poorly. The source highlights nine precautions.
1. Test every tag before publishing
Use Preview and Tag Assistant before publication. Confirm that the tag fires for valid cases, stays quiet for invalid cases, respects each relevant consent state and sends the intended values once. No single indicator can establish that a tag is completely error-free.
2. Avoid duplicate tags
Duplicate container snippets, Google tags or event tags can inflate data and waste resources. Audit both GTM and hard-coded or CMS-managed tags, because the duplicate may exist outside the GTM tag list. Remove it only after identifying the authoritative implementation.
3. Make triggers precise
Broad triggers such as All Pages or All Clicks can send an event in unintended contexts. Define the eligible event and stable filters, then test exclusions and single-page application route changes as well as the positive case.
4. Treat third-party tags cautiously
Each vendor tag adds code, requests and a dependency on that vendor. Keep only tags with an approved reason, owner and vendor review. Delaying a tag may help the page load, but it does not resolve consent duties or govern the data and may lose the event.
5. Use Custom HTML carefully
Custom HTML can execute JavaScript on the live page. Check whether the code is secure, respects privacy, runs correctly and keeps the page responsive. Prefer native templates or sandboxed custom templates that grant only the permissions they need.
6. Keep accounts and containers clearly managed
Create appropriately scoped containers for each company website or app, use consistent names and document ownership. Grant Read, Edit, Approve or Publish access based on each person's job and review access when roles change.
7. Choose an appropriate publication time
For a change that could affect visitors or critical data, use a controlled release window with an owner, live checks and a rollback path. Lower traffic may reduce impact, but it can also make validation slower, so choose timing based on risk rather than a universal rule.
8. Monitor container size and practical limits
Review the container's quality notices and warnings, remove unused items and test the page. A large or complex container does not slow every page in the same way, but accumulated tags and custom code give browsers and maintainers more work.
9. Address privacy and compliance
Document what each tag sends, to whom, for what purpose and under which consent or other lawful basis. Integrate the applicable CMP and consent controls, minimize data and consult qualified privacy or legal reviewers for GDPR and other jurisdiction-specific duties. Publishing a GTM setting does not by itself establish compliance.
10 Common Questions About Google Tag Manager
1. What is Google Tag Manager used for?
Google Tag Manager is a free tool for managing and deploying supported measurement, advertising and third-party tags. Once the container is installed, trained users can make many routine tag changes in GTM, but site code, data-layer, consent and custom implementation work may still need developers.
2. Why does Google Tag Manager appear in my website data?
If a site uses GTM, its container snippet appears in the page source and loads gtm.js. The container then evaluates its configuration and may run tags that send data to Analytics, Ads or another destination. GTM is the deployment layer; the individual tags and destinations determine what is sent and reported.
3. Can I block Google Tag Manager?
A browser, content blocker or network policy may block the GTM script or its requests. Private-browsing mode does not inherently block GTM, and disabling JavaScript can break unrelated site functions. Site owners should provide the consent and preference controls required for their implementation rather than expecting visitors to find a technical workaround.
4. What data can Google Tag Manager help measure?
GTM does not independently decide what to track. It can deploy tags and pass configured events or values for page views, clicks, form outcomes, purchases and other defined interactions. The site's implementation must specify and limit the data, and the destination platform performs the reporting.
5. How can I stop tag-based tracking?
Use the site's privacy or cookie controls where available. Browser content blockers or JavaScript controls may block some client-side tags, but they can affect site operation and do not necessarily block hard-coded, first-party or server-side collection. Consult the site's privacy notice for the controls and rights applicable to that service.
6. How do I know whether a site uses GTM?
For a site you are authorized to inspect, search its source or network activity for a container ID beginning with GTM- or a request to googletagmanager.com/gtm.js. Tag Assistant can also detect and troubleshoot a GTM container. If GTM is absent, the site may still use other tags.
7. When should an organization use Google Tag Manager?
GTM is useful when a team manages several tags, tests updates, keeps versions and assigns clear owners. It also needs suitable access and consent rules. It is especially helpful when measurement changes often, but it cannot replace a sound plan or engineering review.
8. What are Google Tag Manager's disadvantages?
Complex triggers, custom code and data layers require technical skill. If a team manages them poorly, it can duplicate events, expose the site, misuse personal data, slow pages and corrupt reports. A visual interface makes tags easier to deploy but does not make the change low-risk.
9. Is Google Tag Manager required?
No. A site with a simple, stable setup may use a direct Google tag or a supported CMS integration. GTM becomes valuable when several approved tags need coordinated triggers, testing and regular upkeep, and when the team needs to govern access and versions.
10. Is Google Tag Manager safe to use?
GTM can be operated safely, but the answer depends on the code and permissions inside the container. Use trusted native or sandboxed templates where possible, review third-party and Custom HTML code, apply least privilege, test every version, minimize data and monitor production behavior.
Used with those controls, GTM can make approved measurement changes faster and give SEO teams a more maintainable workflow.
The tool is only the starting point; the value comes from connecting reliable data to sound decisions. If you want to examine site data more deeply through website analytics or improve the site through broader SEO work, GlobalBrandsDigital can review how the tags work and how the team uses the results.